In summary:
- Successful apartment composting isn’t about hiding odors; it’s about preventing them by balancing “browns” (carbon) and “greens” (nitrogen) in your bin.
- Choose the right system for your diet and lifestyle: a worm farm is great for vegetable scraps, while Bokashi can handle meat, dairy, and oily foods.
- Integrate composting into your existing routines, like meal prepping or freezing scraps during the week for a single weekend processing session, to make it effortless.
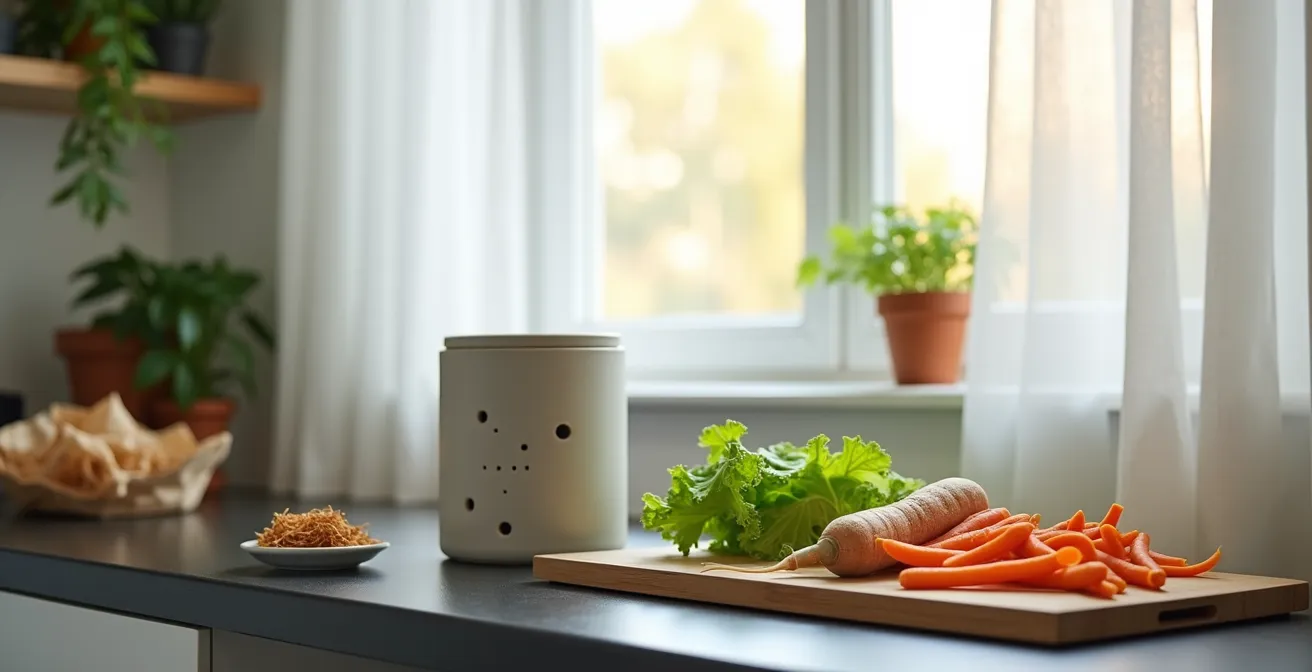
The small kitchen trash can, overflowing with coffee grounds, vegetable peels, and leftovers, is a familiar sight for any city dweller. You want to reduce your environmental footprint, but the idea of composting in a compact apartment brings a wave of anxieties. Will it smell? Will it attract fruit flies or worse? These fears are valid, and they stop countless people from taking a simple step toward a more sustainable lifestyle.
Most advice you’ll find online offers simple but incomplete solutions: “just get a worm bin” or “make sure the lid is tight.” While not wrong, this advice misses the fundamental point. Odors and pests aren’t an inevitable part of composting; they are symptoms of an imbalanced system. The real secret to clean, successful apartment composting has nothing to do with masking problems and everything to do with proactive ecosystem management.
But what if the key wasn’t just containing waste, but transforming it into a valuable resource? The solution is to stop thinking of your compost bin as a trash receptacle and start treating it as a tiny, controlled ecosystem. By understanding and managing its core needs, you can eliminate the very conditions that cause smells and attract pests in the first place.
In this guide, we’ll move beyond the basics to give you that control. We will explore the simple science behind a healthy, odor-free compost system, help you choose the perfect method for your specific living situation, and provide a step-by-step workflow to make composting a seamless and even enjoyable part of your busy urban life.
To help you navigate this process, we’ve broken down the essentials into clear, manageable sections. This structured approach will guide you from understanding the core problem to mastering the daily practice of apartment composting.
Summary: A Guide to Odorless Apartment Composting
- Why Is Your Apple Core Dangerous When Thrown in the Trash?
- How to Balance Carbon and Nitrogen to Keep Worms Alive?
- Bokashi or Worm Farm: Which Handles Meat and Dairy?
- The Citrus Mistake That Kills Your Compost Ecosystem
- When to Harvest Liquid Fertilizer for Maximum Potency?
- Meal Prepping Without Plastic: A Step-by-Step Workflow for Sundays
- When to Invest in Soil Health to Lower Healthcare Costs?
- How to Maintain a Zero-Waste Lifestyle When You Have a Full-Time Job?
Why Is Your Apple Core Dangerous When Thrown in the Trash?
That seemingly harmless apple core or pile of vegetable peels takes on a surprisingly sinister role once it’s sealed in a plastic trash bag and sent to a landfill. The problem lies in what happens next. Buried under tons of other waste and deprived of oxygen, organic matter like food scraps undergoes anaerobic decomposition. This process releases methane, a greenhouse gas with a warming potential over 25 times more potent than carbon dioxide.
The scale of this issue is staggering. Food waste is the single largest component taking up space in U.S. landfills, and according to EPA research, more than 58% of fugitive methane emissions from these sites come directly from our discarded food. When you choose to compost, you are not just making garden soil; you are actively intercepting this waste stream and preventing a significant source of pollution.
By managing this decomposition process in your apartment, you introduce oxygen, facilitating aerobic decomposition. This is the natural, earthy-smelling process that creates nutrient-rich compost instead of harmful methane. Your small action, when multiplied across thousands of households, directly contributes to cleaner air and a more stable climate. It transforms your kitchen from a source of waste into a hub of positive environmental change.
How to Balance Carbon and Nitrogen to Keep Worms Alive?
The single most important principle for a smell-free, healthy worm farm is the carbon-to-nitrogen (C:N) ratio. Think of it as your worms’ diet. Nitrogen-rich materials, or “greens,” are your wet, fresh food scraps like vegetable ends and coffee grounds. Carbon-rich materials, or “browns,” are dry, woody materials like shredded cardboard, paper, and dried leaves. An imbalance is what causes most problems: too much nitrogen leads to a slimy, smelly, anaerobic environment, while too much carbon slows down decomposition to a halt.
This paragraph introduces a complex concept. To better understand it, visualizing the materials is helpful. The illustration below breaks down the textural differences between key carbon and nitrogen sources.
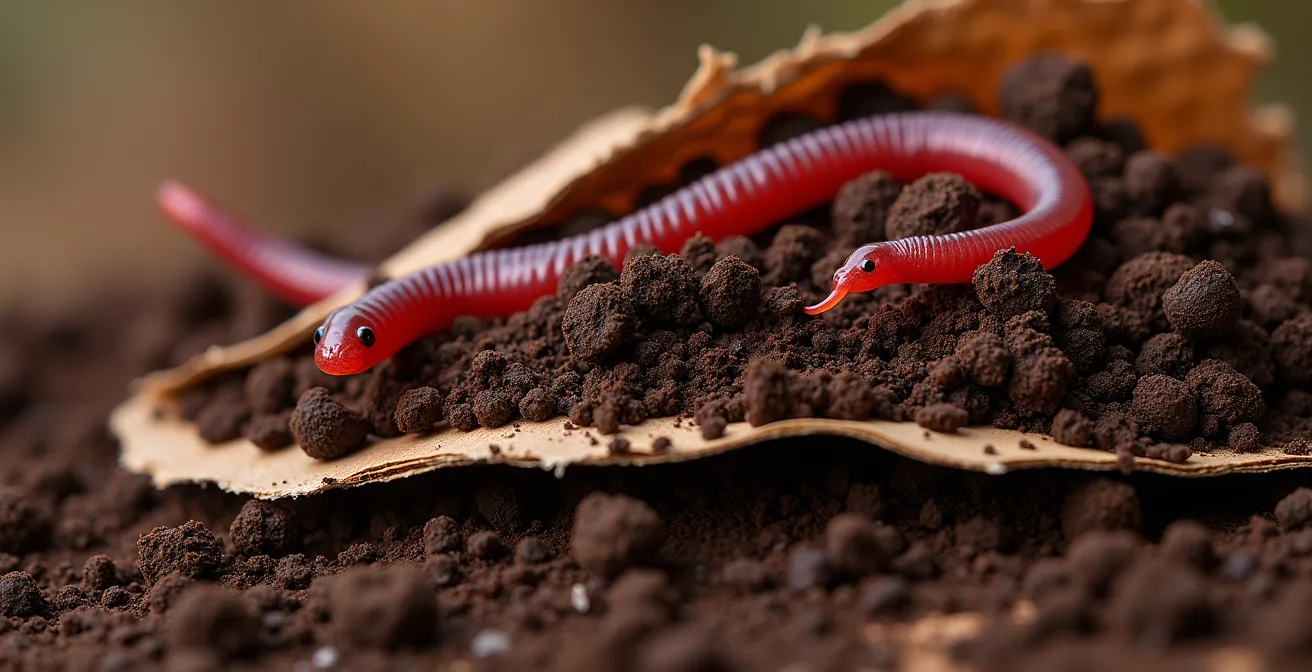
As the image shows, the fibrous cardboard provides structure and air pockets, while the granular coffee grounds provide the fuel. Worms thrive in this balanced environment. For vermicomposting, research from Oklahoma State University Extension recommends a C:N ratio of 50:1 or higher by weight, which means you need significantly more “browns” than “greens.” A good rule of thumb is to add a handful of shredded cardboard every time you add food scraps.
Your Action Plan: Diagnosing Your Compost’s Balance
- Points of Contact: Check your bin’s smell, moisture, and texture. These are your system’s vital signs.
- Collecte: Inventory your typical “greens” (vegetable scraps, coffee grounds) and “browns” (cardboard boxes, paper egg cartons, toilet paper rolls).
- Coherence: Compare your inputs. Are you adding at least twice as much brown material as green material by volume?
- Memorability/Emotion: Use your senses. Does it smell earthy and pleasant (balanced) or like ammonia (too much nitrogen)? A good compost bin smells like a forest floor after rain.
- Plan of Integration: If it smells off, immediately stop adding “greens” and mix in a generous amount of shredded cardboard or paper to absorb excess moisture and restore the C:N balance.
Bokashi or Worm Farm: Which Handles Meat and Dairy?
Choosing the right composting system is like choosing the right tool for a job—it depends entirely on what you need to accomplish. The two most popular methods for apartments, vermicomposting (worm farm) and Bokashi, are excellent but serve different purposes, especially when it comes to handling tricky food scraps like meat, dairy, and oils.
A worm farm is a living ecosystem. The worms are your workforce, and they are picky eaters. They excel at breaking down raw fruit and vegetable scraps, coffee grounds, and tea bags. However, they cannot process meat, dairy, or oily foods, which will rot, create foul odors, and can harm the worms. In contrast, Bokashi is a fermentation process. It uses a special bran inoculated with microbes to pickle your food waste in an airtight bucket. Its superpower is that it can handle virtually anything from your kitchen, including meat, cheese, bones, and cooked leftovers, without rotting or smelling bad.
The table below breaks down the key differences to help you decide which system, or combination of systems, is right for you.
| Feature | Bokashi | Worm Farm |
|---|---|---|
| Handles Meat/Dairy | Yes – ferments all food waste | No – avoid these items |
| Odor Profile | Sweet pickled/yeasty smell | Earthy forest floor smell |
| Processing Time | 2 weeks fermentation | 2-3 months for finished compost |
| Space Required | 2 buckets needed | 1 bin system |
| Maintenance | Add bran daily, drain liquid | Feed weekly, monitor moisture |
| Best For | Squeamish about worms | Want finished compost directly |
The Urban Hybrid System
A growing number of apartment dwellers are adopting a powerful two-stage system. They use a Bokashi bucket to pre-ferment difficult items like meat, dairy, and oily foods for about two weeks. This fermented material is then added to their worm farm. The worms treat this pre-digested, acidic material as a “superfood,” allowing you to compost 100% of your food waste while combining the benefits of both methods and eliminating their individual limitations.
The Citrus Mistake That Kills Your Compost Ecosystem
A common piece of advice for worm composters is to avoid adding citrus peels. Many assume this is because of the acidity, but the truth is more specific and crucial for the health of your worm farm. While high acidity isn’t ideal, the primary danger comes from a compound found in the peels of oranges, lemons, and other citrus fruits: d-limonene.
D-limonene is a powerful natural oil and solvent that is actually used as an organic pesticide. When you add fresh citrus peels to your bin, this oil can irritate the sensitive skin of your composting worms, causing them to avoid that area or, in high concentrations, even killing them. It disrupts the delicate ecosystem you’re trying to cultivate. Throwing in a whole orange peel is one of the fastest ways to cause a worm die-off and stall your composting efforts.
However, this doesn’t mean you can never compost citrus. The key is to neutralize the d-limonene before it gets to your worms. This can be done with a few simple preparation steps that make the peels safe for consumption.
- Dry the peels: The most effective method is to completely dry the peels. You can leave them out in the sun, on a radiator, or bake them in a low oven (around 200°F or 95°C) for 30 minutes until brittle. Drying breaks down the volatile oils.
- Grind into a powder: Once dried, you can crush the peels or grind them into a powder using an old coffee grinder. This increases the surface area and makes them easier for the worms and microbes to process.
- Mix with a buffer: For extra safety, mix the citrus powder with an equal amount of crushed eggshells. The calcium carbonate in the eggshells helps buffer any remaining acidity.
- Add sparingly: Even when prepared, add the citrus mixture in small quantities, ensuring it never makes up more than about 5% of any single feeding.
When to Harvest Liquid Fertilizer for Maximum Potency?
One of the most immediate rewards of both vermicomposting and Bokashi is the production of a nutrient-rich liquid, often called “compost tea” or “leachate.” This liquid gold is a potent, all-natural fertilizer for your houseplants, but knowing when and how to use it is key to unlocking its full potential. The goal isn’t just to drain liquid, but to harvest a thriving microbial solution.
For a worm bin, this liquid collects in the bottom tray. You should aim to harvest it when it’s the color of weak tea—a dark brown, but not black. If the liquid is black and smells foul, it’s a sign that the bin has become anaerobic (lacking oxygen), and this liquid can actually harm your plants. For Bokashi, the “tea” should be drained every 1-2 days to prevent the bucket from becoming waterlogged. This liquid is highly acidic and must be diluted.
To truly maximize its power, you can supercharge this liquid through aeration. By using a simple aquarium pump to bubble air through the collected liquid for 24 hours, you can dramatically increase the population of beneficial aerobic microbes. In fact, studies on actively aerated compost tea show a 1000x increase in beneficial microbe count, turning a simple fertilizer into a powerful soil probiotic. Once aerated, it’s ready to be diluted and used:
- For seedlings and delicate plants: Dilute the compost tea at a ratio of 1:20 with water. A little goes a long way.
- For mature houseplants: A standard dilution of 1:10 during the growing season (spring and summer) provides an excellent nutrient boost.
- For flowering or fruiting plants: To encourage blooms, you can use a slightly stronger mix at a 1:5 ratio.
Meal Prepping Without Plastic: A Step-by-Step Workflow for Sundays
Integrating composting into a busy schedule is about efficiency. The best way to do this is to piggyback the task onto a routine you already have, like weekly meal prepping. By creating a dedicated workflow, you can process your food scraps and prepare your meals simultaneously, all while eliminating plastic waste and making composting feel like a natural part of cooking.
The key is to set up your station before you begin. Instead of walking back and forth to the trash can or compost bin, bring the collection caddy directly to your cutting board. This creates a seamless “scrap-to-bin” pipeline. This organized approach not only saves time but also makes the process cleaner and more intentional.
This overhead view shows an ideal setup, with glass containers for prepped meals, and vegetable scraps neatly organized, ready for the compost caddy.
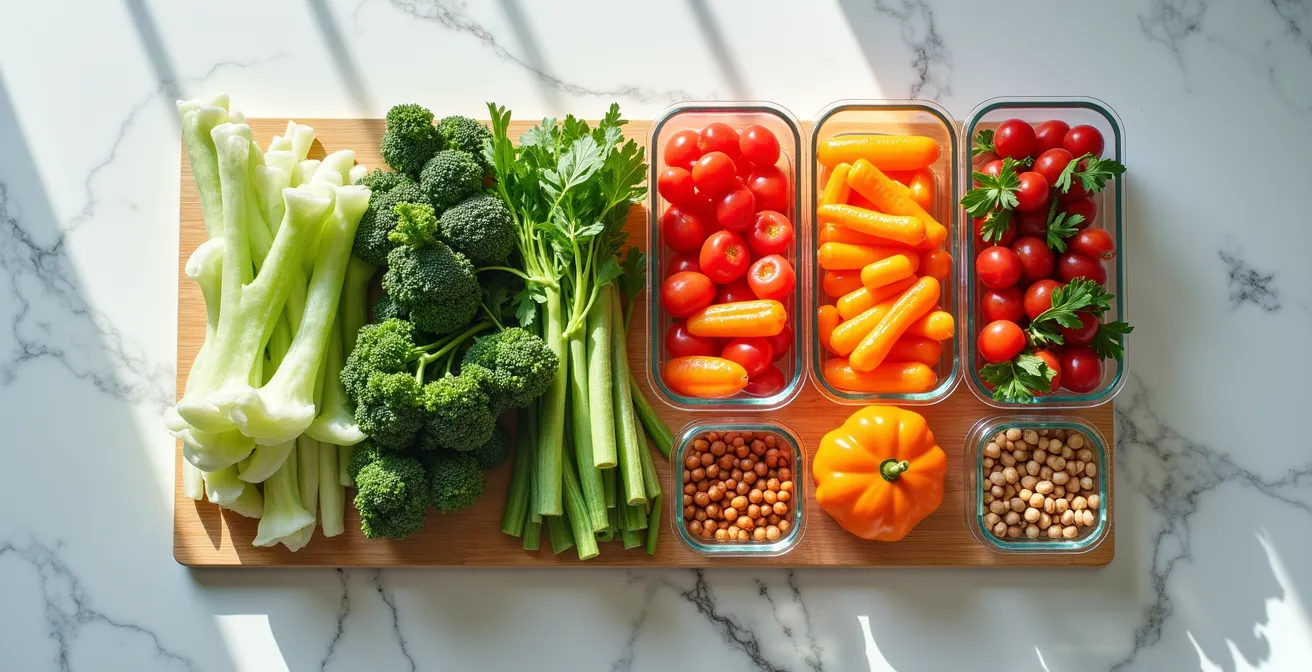
As you can see, a successful workflow is about creating designated zones. You can take this a step further by immediately sorting scraps. For example, have one small bowl for “greens” (vegetable ends, fruit peels) for the compost and another for items destined for a “scrap broth” (onion skins, carrot peels, celery ends). Simmering these scraps in water for 30-60 minutes creates a flavorful vegetable broth, extracting one last layer of value before they are composted. Finally, storing all your prepped meals in glass containers not only keeps food fresher but completely removes single-use plastic from your weekly routine.
When to Invest in Soil Health to Lower Healthcare Costs?
The “return on investment” from apartment composting goes far beyond simply reducing your trash volume. The initial setup—whether it’s a worm bin or a Bokashi kit—is an investment in a system that produces tangible, valuable returns. This is where the long-term benefits begin to compound, connecting your soil health directly to your personal and financial well-being.
The most immediate return is a constant supply of free, high-quality fertilizer. A healthy vermicompost system can produce both solid castings (worm manure) and liquid compost tea. For an urban dweller with a collection of houseplants or a balcony garden, this can easily replace store-bought fertilizers, saving an estimated $20-30 per month. But the value doesn’t stop there.
With your own source of nutrient-dense compost, you gain the ability to grow your own food, even on a small scale. Growing microgreens or herbs on a windowsill becomes incredibly cost-effective. These homegrown foods are more nutrient-dense than most store-bought equivalents, contributing directly to a healthier diet. Furthermore, many composters report significant mental health benefits. The daily, mindful practice of tending to a living system—feeding the worms, draining the tea, and watching waste turn into a resource—can be a grounding and deeply rewarding ritual in a hectic urban environment.
The total ROI encompasses not just fertilizer savings, but reduced food costs from home-grown greens, a potential reduction in municipal garbage fees, and the often-undocumented but highly valuable boost to mental wellness. It’s an investment that pays dividends for your wallet, your health, and your peace of mind.
Key Takeaways
- The primary cause of odors and pests in apartment composting is an imbalance of carbon (“browns”) and nitrogen (“greens”), not the process itself.
- Choosing the right system is crucial: worm farms are ideal for vegetable scraps, while Bokashi fermentation can handle all food waste, including meat and dairy.
- Integrating composting into existing routines, such as a “freeze and batch” workflow or Sunday meal prep, is the key to maintaining the practice with a busy schedule.
How to Maintain a Zero-Waste Lifestyle When You Have a Full-Time Job?
The biggest hurdle for many aspiring zero-wasters isn’t desire, but time. When you have a full-time job, any new habit has to be efficient and low-maintenance to stick. The good news is that modern composting methods are designed for this reality. Success isn’t about dedicating hours each week; it’s about choosing a system that matches your availability and establishing a simple, repeatable workflow.
For the truly time-crunched professional, an electric composter offers the fastest solution, turning scraps into a dehydrated soil amendment in a matter of hours with virtually no maintenance. However, for those wanting a more traditional process, the time commitment is still minimal when managed correctly. The key is to understand the trade-offs between different methods.
The “freeze and batch” workflow is a game-changer for busy people using worm farms or Bokashi. It eliminates any daily composting tasks. Simply keep a large, sealed container or bag in your freezer and add all your food scraps to it throughout the week. The freezing prevents any odors or fruit flies from developing. Then, on the weekend, you can thaw the scraps and add them to your compost bin in a single 10-minute session. This approach combines the benefits of composting with a workflow that respects the demands of a busy professional life.
| Method | Setup Time | Weekly Maintenance | Best For |
|---|---|---|---|
| Bokashi | 15 minutes | 10-15 minutes | Daily food waste, minimal effort |
| Vermicomposting | 1 hour | 20-30 minutes | Continuous processing, garden enthusiasts |
| Electric Composter | 5 minutes | 5 minutes | Busy professionals, instant results |
| Collection Only | 2 minutes | 5 minutes | Community drop-off access |
By shifting your perspective from “disposing of waste” to “managing a resource,” composting becomes an empowering and rewarding part of urban living. Start today by choosing one small step, whether it’s collecting cardboard for your future bin or simply freezing your scraps for a week to see how much you divert from the landfill.