
In summary:
- Beyond normal degradation, major efficiency loss after 10 years stems from diagnosable issues like micro-cracks, overheating, and inverter aging.
- Troubleshooting requires a systematic, technician-level approach: inspect for physical damage, analyze system-level data, and check environmental factors like ventilation.
- Upgrading key components, especially a decade-old string inverter, often resolves multiple performance bottlenecks and unlocks modern capabilities like battery integration.
Your solar panel system has been a faithful workhorse for a decade, but lately, the numbers on your monitoring app or utility bill just don’t add up. The savings aren’t what they used to be, and you’re wondering if this is simply the end of the line. You’ve probably heard it’s just “normal degradation” or been given the generic advice to “clean the panels.” While there’s a kernel of truth there, these explanations often miss the bigger picture.
As a solar maintenance technician, I can tell you that significant efficiency loss is frequently a symptom of a specific, diagnosable problem, not an unavoidable fate. The real culprits are often hidden issues that accelerate wear and tear, and they can be identified and fixed with a bit of systematic troubleshooting. Treating your array like a patient requiring a check-up, rather than an appliance that’s just getting old, is the key to restoring its performance.
This guide provides that diagnostic framework. We’ll move beyond the surface-level advice to uncover the “why” behind performance drops. We will equip you with the knowledge to pinpoint the exact failure points—from invisible micro-cracks and ventilation mistakes to grid-level conflicts that choke your production. By understanding these root causes, you can take targeted action to prevent further efficiency loss and get your system back to peak health.
To navigate this diagnostic journey, we’ve structured this guide to address the most critical failure points of a 10-year-old solar system. The following sections will walk you through each potential issue, providing clear explanations and actionable solutions.
Summary : A Diagnostic Guide to 10-Year Solar Panel Performance
- Why Do Micro-Cracks Form and Lower Voltage Output?
- How to Clean Panels Without Scratching the Anti-Reflective Coating?
- String Inverter or Micro-inverters: Which Handles Partial Shade Better?
- The Ventilation Mistake That Overheats Panels and Cuts Power
- When to Replace Your Inverter: The 10-Year Rule?
- Why Does Too Much Solar Power Crash the Grid Without Storage?
- When to Upgrade Windows: Before or After Insulating the Attic?
- How to Identify Thermal Bridges Losing You $500 a Year?
Why Do Micro-Cracks Form and Lower Voltage Output?
One of the most insidious and often invisible causes of significant power loss in aging solar panels is the formation of micro-cracks. These are tiny, spiderweb-like fractures in the silicon cells that are usually impossible to see with the naked eye. They can be caused by thermal stress (the expansion and contraction from daily temperature cycles), extreme weather like heavy snow or hail, or even mishandling during the initial installation a decade ago. While they seem small, their impact is anything but; in some cases, studies indicate power losses can reach up to 60% in affected cells.
The technical problem with micro-cracks is that they disrupt the electrical path within the cell. This increases electrical resistance, which in turn generates heat. These heated areas become hot spots, which are not only inefficient but can also accelerate the degradation of the panel’s materials, creating a vicious cycle. An extensive analysis of 4,000 solar cells found a direct correlation between the presence of micro-cracks and performance-killing hot spots, with power losses ranging from under 1% to nearly 43% in damaged cells.
To properly diagnose this, technicians use a technique called electroluminescence (EL) imaging, which is like an X-ray for solar panels. It passes a current through the panel in the dark, causing it to light up. The micro-cracks appear as dark lines or areas, revealing the true extent of the damage.
As this EL image shows, the cracks sever connections within the cell, creating “dead” zones that no longer produce power. For a homeowner, a key symptom of widespread micro-cracks is a noticeable drop in the system’s open-circuit voltage that can’t be explained by soiling or shading. If one or two panels are severely underperforming the rest of the array, micro-cracks are a primary suspect.
How to Clean Panels Without Scratching the Anti-Reflective Coating?
While “clean your panels” is common advice, *how* you clean them is critically important, especially on 10-year-old models. The surface of your panels has a microscopically thin anti-reflective (AR) coating. Its job is to maximize the amount of light that enters the cell instead of bouncing off. Over a decade, this coating has been exposed to UV rays and the elements, making it more delicate. Aggressive cleaning with harsh brushes, abrasive chemicals, or even high-pressure water can permanently scratch or strip this coating away, leading to a measurable drop in production that no amount of future cleaning can fix.
The goal is to remove dirt, dust, and bird droppings with the least amount of physical contact possible. A simple rinse with a garden hose is often sufficient, especially if done in the early morning or evening when the panels are cool to prevent thermal shock and hard water spotting. Experts generally recommend cleaning panels between two to four times per year, but this depends heavily on your local environment—dusty, agricultural, or high-pollen areas may require more frequent attention.
For safe and effective cleaning that preserves the AR coating, follow these professional guidelines:
- Never use abrasive detergents or soaps. If water alone isn’t enough, use a highly diluted, specialized solar panel cleaning solution and a very soft-bristled brush on an extension pole.
- For the final rinse, using deionized water is the gold standard. It prevents mineral deposits from hard water, which can build up and etch the glass over time, effectively creating a new layer of “soiling.”
- Only use a soft cloth or sponge for stubborn grime like bird droppings after they’ve been softened with water. Let the water do the work, not elbow grease.
- Always prioritize safety. Avoid climbing on your roof whenever possible by using extension poles. If you must get on the roof, use appropriate safety gear and be careful not to step on or apply pressure to the panels themselves.
String Inverter or Micro-inverters: Which Handles Partial Shade Better?
A decade ago, the vast majority of residential solar installations used a string inverter. This technology connects all of your solar panels in a series (a “string”), and that combined DC power is sent to a single, centralized inverter box to be converted to AC power for your home. The critical drawback of this setup is the “Christmas light effect”: if one panel’s production drops due to shade, dirt, or age-related failure, the output of the *entire string* is dragged down to the level of that single weakest panel. After 10 years, age-related mismatch between panels becomes more pronounced, exacerbating this problem.
In contrast, micro-inverters are small inverters installed on the back of each individual panel. Each panel operates independently, converting its DC power to AC right at the source. If one panel is shaded, only that single panel’s output is affected; the rest of the system continues to produce at full capacity. This makes them vastly superior for handling partial shade and age-related performance mismatch.
As an authority in the field, Enphase Energy, a pioneer of microinverter technology, highlights the core benefit for system resilience in their Solar Panel Maintenance Guide:
When you install microinverters, one inverter’s failure will not affect another panel’s performance. On the other hand, in a string inverter-based solar energy system, inverter failure can temporarily shut down all your panels until the necessary maintenance is performed.
– Enphase Energy, Solar Panel Maintenance Guide
The architectural difference is stark. A string system is a single point of failure, while a micro-inverter system is distributed and resilient.
For a 10-year-old system suffering from intermittent shading or an underperforming panel, the limitations of a string inverter become a significant bottleneck. Upgrading to micro-inverters or power optimizers (a similar panel-level technology) can often “unlock” the lost production from the healthy panels in the array.
The Ventilation Mistake That Overheats Panels and Cuts Power
Solar panels are tested for efficiency at a standard temperature of 25°C (77°F), but on a sunny day, their surface temperature can easily soar to 65°C (150°F) or higher. This heat is a major enemy of efficiency. Every solar panel has a “temperature coefficient,” which tells you how much power it loses for every degree above the test temperature. For many panels, this is a significant figure; when temperatures rise above 90 degrees, solar panels lose efficiency by around 1% per degree. An overheated panel is an underproducing panel.
A common mistake in older installations is insufficient ventilation. If panels are mounted too flush to the roof, there isn’t enough space for air to circulate underneath and carry away the waste heat. This trapped hot air dramatically raises the operating temperature of the cells, slashing your power output on the hottest, sunniest days when you expect to produce the most. A well-designed system allows for several inches of clearance to promote natural convective cooling.
If you suspect your system is choking on its own heat, you can perform a basic diagnostic check. An infrared thermometer is the best tool for this, allowing you to safely measure the panel surface temperature from the ground. If your panels are consistently running 30°C (54°F) or more above the ambient air temperature, you likely have a ventilation problem that is costing you significant energy production.
Your Action Plan: Homeowner’s Ventilation Audit
- On a hot, sunny day, use an infrared thermometer to measure the surface temperature of your panels.
- Immediately measure the ambient air temperature in a shaded area. Calculate the difference (delta).
- If the temperature delta exceeds 30°C (54°F), your ventilation is likely insufficient and is costing you power.
- Investigate solutions like elevating the panels a few more inches off the roof with taller standoffs to improve airflow.
- Consider installing attic vents or roof turbines that can help pull hot air out from under the solar array, actively cooling it.
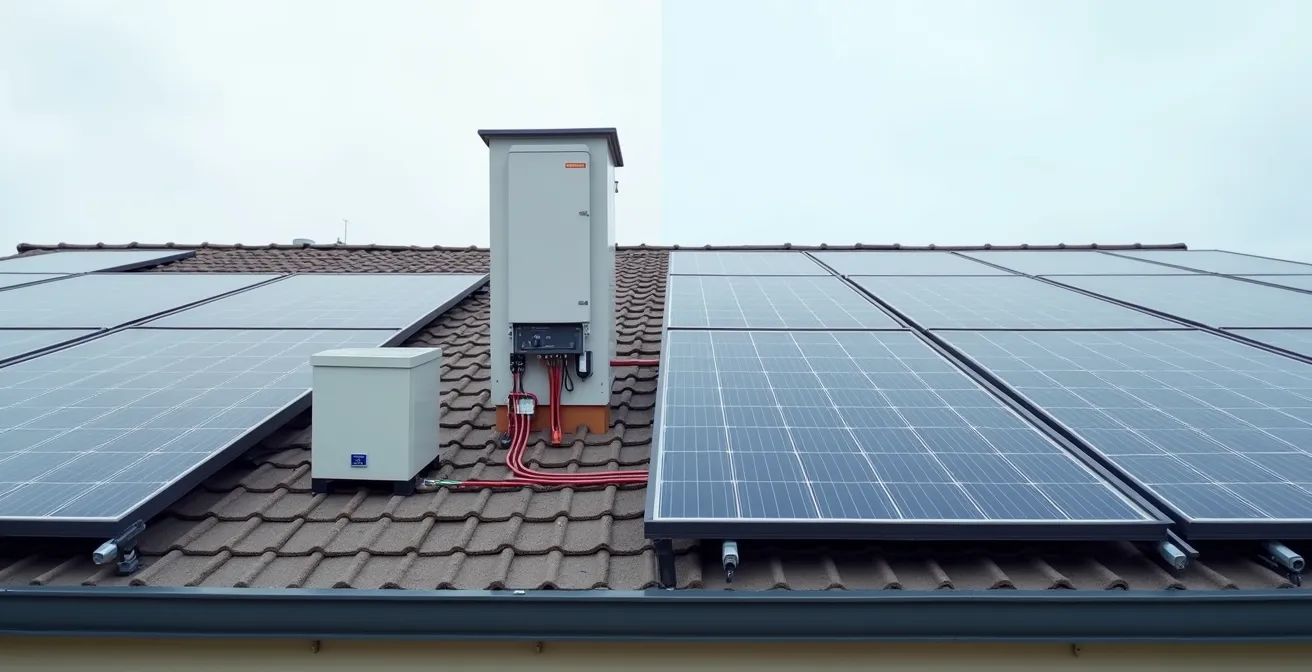
When to Replace Your Inverter: The 10-Year Rule?
While your solar panels are warrantied for 25 years, the inverter—the brain of your system—has a much shorter lifespan. For traditional string inverters, the typical warranty is only 10 to 15 years. This isn’t a marketing gimmick; it’s a reflection of the fact that the electronic components inside (like capacitors) degrade over time, especially when dealing with high power loads day in and day out. As a general rule of thumb, it’s widely accepted that inverters require replacement more frequently than solar panels do, which is once every 10 years.
After a decade of service, your string inverter is likely operating far below its original efficiency. It consumes more power just to run itself, it’s less effective at converting DC to AC power, and its maximum power point tracking (MPPT) algorithm—which optimizes output from the panels—is likely outdated and less responsive than modern versions. Signs that your inverter is at the end of its life include a noticeable increase in audible humming or buzzing, more frequent disconnections from your monitoring platform, or a system-wide drop in production that cleaning and shade management can’t explain.
Replacing a 10-year-old inverter isn’t just about restoring lost performance; it’s a strategic upgrade. Modern inverters are “smarter,” more efficient, and often come ready for battery storage. A new hybrid inverter can seamlessly integrate a home battery now or in the future, allowing you to store your excess solar energy instead of sending it to the grid for minimal credit. Furthermore, older inverters often no longer receive firmware updates, leaving them less equipped to handle modern grid conditions and potentially vulnerable from a security standpoint.
Why Does Too Much Solar Power Crash the Grid Without Storage?
This may sound counterintuitive, but on a sunny afternoon in a neighborhood with high solar adoption, your inverter might shut down *because* there’s too much solar power being produced. This phenomenon is known as over-voltage tripping and is a growing problem for older systems. Here’s how it works: as dozens of solar systems in your area export their excess power to the local grid simultaneously, the voltage on the utility lines begins to rise. Your inverter is designed with a protective function to disconnect from the grid if the voltage goes above a certain safety limit (e.g., 253V on a 240V system).
Older inverters from a decade ago have very strict, narrow voltage operating windows. As a result, when the grid voltage creeps up on a sunny day, these older units will trip offline to protect themselves, ceasing all power production. This can happen multiple times during peak sun hours, precisely when you should be generating the most energy. You might see this as sudden, inexplicable drops to zero production in your monitoring data that last for a few minutes before the system reconnects.
Modern “grid-smart” inverters are designed to handle this problem. They have a wider operating voltage range and can actively help stabilize the grid by using features like Volt-VAR control, where they absorb or supply reactive power to manage local voltage fluctuations. As a recent analysis of grid issues explains, this over-voltage tripping is a key reason why upgrading an old inverter can immediately boost annual energy production, as the new unit can “ride through” these voltage events without disconnecting. This is separate from, but related to, issues like Potential-Induced Degradation (PID), which also becomes more prominent at the higher string voltages common in residential arrays.
When to Upgrade Windows: Before or After Insulating the Attic?
Once you’ve diagnosed and optimized your solar array’s production, the next step is to address the demand side of the equation: your home’s energy consumption. Every kilowatt-hour you *don’t* use is a kilowatt-hour you can export to the grid or store in a battery. Two of the biggest energy efficiency upgrades are attic insulation and new windows, but prioritizing them correctly is key to maximizing your solar investment. The diagnostic question is: are you trying to reduce your baseload consumption or your peak load consumption?
Attic insulation primarily impacts your baseload energy use. It works 24/7, year-round, to reduce heat transfer. In the winter, it keeps the heat from your furnace inside, and in the summer, it stops the sun’s heat from penetrating your living space. This provides a consistent, round-the-clock reduction in your heating and cooling needs.
Window upgrades, on the other hand, have their biggest impact on peak loads, particularly during hot, sunny afternoons. Old, single-pane or leaky double-pane windows are a major source of solar heat gain, forcing your air conditioner to work much harder. High-performance windows with low-E coatings can dramatically cut this peak cooling demand. This is a seasonal benefit, but a powerful one.
From a return-on-investment perspective, especially when paired with a solar system, the priority often becomes clear, as this comparative analysis shows.
| Upgrade Type | Baseload Impact | Peak Load Impact | Typical ROI Period | Solar System Benefit |
|---|---|---|---|---|
| Attic Insulation | High (24/7 reduction) | Moderate | 3-5 years | Consistent kWh availability increase |
| Window Upgrade | Low-Moderate | High (cooling season) | 7-10 years | Seasonal kWh availability increase |
For most homeowners, the answer is to insulate the attic first. It provides a faster, more consistent return on investment by lowering your year-round energy baseload, freeing up more of your solar production for other uses.
Key takeaways
- Efficiency loss is often a symptom of specific, fixable problems like overheating or inverter failure, not just inevitable aging.
- The inverter is the system’s brain and its most common failure point after a decade; upgrading it can solve multiple performance bottlenecks at once.
- Physical factors like invisible micro-cracks, improper cleaning, and poor ventilation can be diagnosed and mitigated with careful, targeted maintenance.
How to Identify Thermal Bridges Losing You $500 a Year?
The final step in our diagnostic process is to ensure that the precious kilowatt-hours your aging solar system produces aren’t immediately being wasted. After a decade, small leaks in your home’s “thermal envelope” can add up to significant energy loss. These leaks are known as thermal bridges—areas where heat can bypass your insulation. Common culprits include uninsulated window and door frames, electrical outlets on exterior walls, and junctions where the foundation meets the walls. They act like highways for heat, forcing your HVAC system to run constantly to compensate.
Just as an infrared camera can detect hot spots on a solar panel, it is also the perfect tool for a “post-solar” energy audit of your home. By scanning your walls and ceilings with an IR camera on a cold day, thermal bridges appear as distinct cold streaks or spots, visually showing you exactly where you’re losing money. Fixing these issues—often with simple solutions like caulk, spray foam, or new gaskets—ensures that the power your solar panels generate is used to improve your comfort, not to fight against constant energy leaks.
This whole-home approach is critical because it addresses the context in which your solar system operates. According to the National Renewable Energy Laboratory, the baseline productivity of solar panels decreases by about 0.8% per year on average. Your goal is to prevent *accelerated* degradation from the issues we’ve discussed, and then to make every single kWh produced by your panels count. A comprehensive inspection of your home’s envelope is just as important as checking the electrical hardware of your solar array. It plugs the leaks in your “energy bucket,” maximizing the value of every drop your system provides.
To truly maximize your system’s lifespan and output, the next logical step is to perform a comprehensive energy audit of both your solar array and your home’s efficiency, applying this diagnostic framework to create a targeted improvement plan.
Frequently Asked Questions on 10-Year Solar Maintenance
What are the signs my 10-year-old inverter needs replacement?
Increased self-consumption (using more power just to run), audible humming/buzzing that has grown louder over time, frequent disconnections from monitoring platform, and significant drop in system efficiency that cleaning doesn’t resolve.
Should I upgrade to a battery-ready inverter?
Yes, modern hybrid inverters can seamlessly integrate battery storage now or in the future, dramatically increasing the value and utility of your existing solar array.
How do firmware updates affect older inverters?
10-year-old inverters often lack modern ‘grid-smart’ features and may no longer receive security or performance updates, making them less efficient and potentially vulnerable.